
This page is dedicated to the knowledge I have learned from metal detecting which may help others interested in the hobby. The bottom line is that most of it is down to shear luck, what we need to do is get luck on our side. We must have a positive attitude towards research. We need to think and ask ourselves how people would have behaved in the past? Where they would have walked, where they would have settled and what they would have been doing? We need to find the right places to search which will in time give us a better chance of success.
CHOOSING THE RIGHT DETECTOR
Choosing the right detector is very important and is a mater of trial and error. You should always try the machine in question before buying. Pretty much everyone I know seems to run C-Scope down but when I tried one I thought it was great. The detector is simple to operate and the features easy to remember. The R1 has found many items on this website and I‘m sure in time it will find many more. Another detector I like is the Whites MXT. This machine is a simple switch on an go detector which in my opinion would be well suited to most people. The sensitivity is excellent and the depth capabilities rival those of the best detectors on the market. Some would say it’s only half a DFX, but I say it’s much more if you give it the chance. Simplicity over complexity is the key to finding a good detector. Sure there are those out there who like all the technical stuff but for us technophobes keeping it simple can make all the difference.
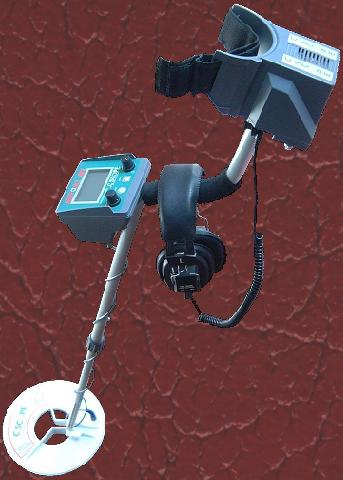 |
My much loved C-Scope Newforce R1 This machine has 3 standard programs to choose from Coin inland, Coin Beach and All Metal Mode. It also has two extra spaces for custom programs designed for more advanced users. The ID display gives values from 0 to 20 as targets increase in conductivity. This machine also has disc edit, learn accept and learn reject features. Audio discrimination is also available in both motion and pinpoint modes.
0 = Ground. (Always discriminated.) 4-8 = Iron / very corroded non-ferrous and foil. 8-15 = Foil / copper nickel / gold rings / small silver coins. (Hammered coins, milled sixpences, three pence, shillings and modern pound coin. Also small buttons, buckles and musket balls.) 16 = Foil / small silver and copper coins. (Decimal penny, milled sixpences, three pence and shillings.) 17-18 = Larger highly conductive copper/bronze/silver objects. (Pre-decimal penny, buckles, large buttons.) 19-20 = Large highly conductive silver, copper, bronze objects and coins. (Pre-decimal penny, decimal 2P, silver half crown, crown, large buckles.) |
Trying a detector is one step towards the goal of finding a perfect partner. Prior knowledge is power and you can never underestimate the value of experience gained by others. Before going into a deal arm yourself with as much knowledge as you can. Most seasoned detectorists will know about the pros and cons of their detectors and will be able to guide you in the right direction. For example I have found that my Newforce likes finding bronze and copper targets whereas my MXT likes foil and silver. There will in most cases be a reason why a detectorist chooses a particular detector and it couldn't hurt to ask.
At the end of the day it is simply trying to find the right machine for you! Asking people who have experience and testing detectors yourself is probably the best way of achieving this goal.
|
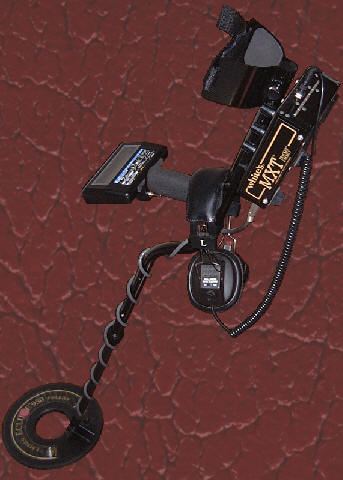
My White's MXT This is a great switch on and go detector, it has three modes Coin Jewellery, Relic and Prospecting for all you gold diggers! I have found the discrim, sensitivity and depth on this machine to be excellent. Perfect for rallies and club digs where you don't get much time to setup. There is an easy to read digital LCD display with target ID and depth indication in the pinpoint mode. This machine loves silver which also makes it well suited for finding hammered coins.
-95 to -30 = Iron. -29 to -5 = Iron, very corroded non-ferrous and foil. -5 to +10 = Foil, buttons and shotgun cartridges. +11 to +40 = Hammered and milled silver coins, small bronze and copper coins, buttons, shotgun cartridges and musket balls. +41 to +60 = Larger buttons, copper, bronze, silver coins and small buckles. +61 to +95 = Large buckles, Roman bronze coins and non-ferrous artefacts. |
 |
When you become a more advanced user you might want to consider upgrading to a top notch machine like the White’s DFX. It has so many features you'll hardly believe you eyes! This is the ultimate in programmable metal detecting and boy am I glad I’ve got one. This machine is very complex so not in my opinion for newbies. Even with my experience it has taken over a year to get fully acquainted with the controls.
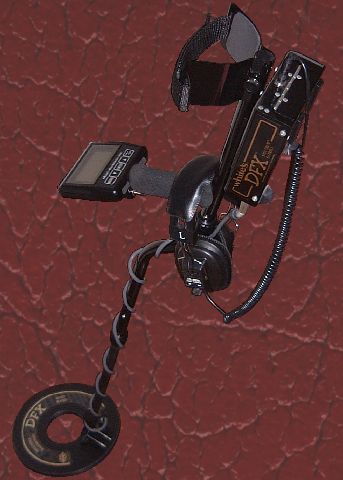 |
My White's DFX The White's DFX comes equipped with a dual frequency coil and is able to operate at 3 kHz, 15 kHz or both simultaneously for better performance. Being fully programmable you are able to save your settings and create custom programs dedicated to your preference. There is a good sized screen which is easy to read and can be back lit when in poor visibility conditions. Highly sensitive and accurate pinpointing, well balanced, well made and great fun. Comes with standard programs, Coin, Coin & Jewellery, Jewellery & Beach, Relic and Prospecting, also EEPROM DP-Silver, EEPROM HI-Trash, EEPROM Demo, EEPROM HI-Pro. In Dual Frequency Best Data Mode -95 to -30 = Iron. -29 to -5 = Iron, very corroded non-ferrous and foil. -5 to +10 = Foil, buttons, small hammered silver coins and shotgun cartridges. +11 to +40 = Hammered and milled silver coins, small bronze and copper coins, buttons, shotgun cartridges, musket balls and Lead bullets. +41 to +60 = Larger buttons, milled copper, bronze, silver coins, hammered silver coins, small buckles and copper bullets. +61 to +94 = Large buckles, Roman bronze coins and non-ferrous artefacts. +95 = Hot rocks, Hot Rock Reject |

CLICK ON IMAGE TO VISIT DETECNICKS TREASURE HUNTING EQUIPMENT AND ACCESSORIES |
|
AFTERMARKET COILS
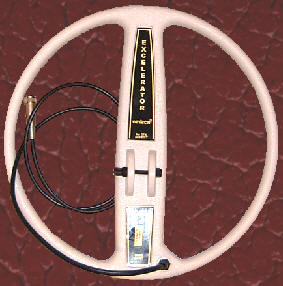
My 14in White's DFX/MXT Deep Seeking Excelerator Coil. (Discontinued by UK suppliers) |
A wide range of aftermarket coils have arrived for the detecting fraternity recently so when buying a new detector it might be worth checking out. Most manufacturers produce standard coils for their machines for best all-round performance, however, there may be some situations where you may feel you could do better with a different coil. To give an example there have been many occasions where I wish I could scan deeper and make finds on some of my hunted out sites. Well I am very lucky to be one of the first in the UK to own a 14 inch Excelerator coil. This coil should be able to send me to depths never heard of before with White's machines. Aside the benefits of extra depth the increase in coil size should also lead to better ground coverage and hence the possibility of faster and more efficient searching. Let's hope it brings up the goods as I can't wait to try the 12.5 and 18 inch versions! Of course there are some situations where smaller coils are needed, particularly so when searching stubble fields such as barley, wheat, rye, rapeseed and sweet corn. In this scenario larger coils struggle at best to wade through what can be described as an almost impervious carpet of crop leftovers. However do not despair, the smaller coil is able navigate its way through this irritating layer of stalks much more easily and although you loose some depth there are more advantages than disadvantages. Smaller coils are lighter, have better target separation and are more manoeuvrable, perfect for tight and awkward places where large coils fail to deliver. Remember as a general rule the closer your coil is to the ground the better your detecting capabilities. |
What I think of the 14DD Excelerator Coil for the DFX/MXT
Initially I was full of enthusiasm about the concept of using a bigger coil for better depth, and I still am! But as I have learned things are not always as rosy as some people say they are. Okay using the MXT and based on a few rough calculations I predicted that I would get a maximum depth increase of roughly 60% over the stock 950 coil supplied by White’s. The theoretical sounds very impressive and certainly looks good on paper, a coin found at maximum depth 10ins with the 950 could be found at a whopping 16ins with the 14DD Excelerator. However, in practice it turned out to be a very different story. Fitting to the MXT was quite a struggle and it took some time to slowly wriggle the shaft of the detector between the anchors of the coil. When all was said and done I was pleasantly surprised to find the coil well balanced and fairly easy to keep level due to its tight fitment on the detector. With everything looking good and having replaced my old batteries I was confident I was going to have a good days detecting. So far so good, it's from here that everything starts to go wrong. Out in the field I found it almost impossible to get stability, the thing would be giving me false signals all over the place. It was almost like some kind of constant interference. Thinking it might have something to do with the overhead power lines I moved several fields away and guess what? Exactly the same thing happened! No matter where I went, from one of my own sites to a club site nearly forty miles away the same, or similar behaviour occurred. The only way I could use this coil was to turn the sensitivity right down on the detector and as far as I am concerned when talking about depth it completely defeats the object of using a large coil in the first place. So a pretty damming report? Well no not entirely. With the size of the area being detected now much larger than the White’s 950 I was able to process significantly more land in a quicker time. Hence I think this coil would be very good for surveying new sites as, and when I get them. But from my experience so far the Excelerator 14DD doesn’t offer any extra depth over the stock coil what so ever, shame! I will have to see how it performs on the DFX.
Okay this time I took the 14DD out with the DFX. The site was in short stubble and the soil conditions very wet, but most notably there were no overhead power lines. Switching on the DFX and going into Relic Mode I was met with the same false signalling that plagued my outing with the MXT. Detuning AC Sensitivity stopped the detector going off just like it did with the MXT so no surprises there. Now having gained some stability I played with the AC sensitivity until I found an optimum setting, AC Sensitivity 40. Bingo! It was time to detect. While going along I found setting Track Offset to +2 and increasing SAT speed to 7 gave better stability as did increasing ground filters from 3 to 5. Also the ground was giving me some feedback, probably due to wet conditions, so setting Hot Rock Reject to 20 helped to counter the effect. Swing the coil much slower than normal also helped but there was still a lot of chatter. Brushing the top of the barley stubble also caused a lot of false signals as did the action of suddenly lifting and lowering the detector. So keeping the coil level above the ground was critical and I must say extremely difficult on barley stubble. In the end I was able to detect using the 14DD but after about an hour of slow tedious work I decided to quit and go back to my stock coil. When I got home I started to wonder if the coil might be faulty and after searching on the web I found a forum where someone had a similar problem, constant chattering and false signals. I am now going to send the coil off and get it tested hopefully then I can get an answer. If the coil turns out to be faulty then it doesn’t say much about their quality having already replaced it twice before for two other completely unrelated incidents. As for larger coils in general I can’t really say many people use them and report good success, some people like me have only ever had bad experiences so I’ll let you be the final judge.
Detech Excelerator II 12.5DD Coil for Whites DFX/MXT - A Very Different Story!!!
(This coil is no longer available for Whites detectors, it has been discontinued by UK suppliers in favour for the new SEF Buttlerfly. A judgemental mistake on their part in my opinion, read on to find out why.)
After my harrowing experience with Detech’s first line of super sized coils I was naturally very cautious about buying another one. However while on a rally I saw several people using a new version of Excelerator coil dubbed the Excelerator II. What’s the difference I asked? The answer turned out to be “not a lot” according to most detector suppliers like Regton’s and Joan Allen. But having been out in the field and witnessed how good these new coils were I felt I had to get one.
Last time I went for the 14DD which turned out to be a complete disaster so this time I decided to go for the slightly smaller and more practical 12.5DD. Having had a long chat with the supplier I anxiously parted with my money and waited two days before the new coil arrived. There were lots of thoughts buzzing through my head and most of them were negative but when I opened the box I was very pleasantly surprised. Inside was a sleek looking product which was well made and fitted the MXT perfectly. Switching on the detector I was confronted with a stable threshold tone and the signals I picked around the dinning room were loud and clear. Gone were most of the problems that plagued the previous design and there was even a coil cover for extra protection. So on with the investigation which took the form of an air test on my lawn. First off was a large cartwheel penny which was detected quite comfortably at a foot and then a small cut half hammered penny which was detected around 5in. The latter surprised me having been told larger DDs lose sensitivity to smaller objects I didn’t expect the coil to pick it up. Well I guess you can’t believe everything they say, can you? Moving into the field all my worries quickly evaporated and I found the coil to be an excellent improvement over the White’s stock 950. At first pinpointing was difficult but I quickly got used to it and before long I was pulling up all sorts of things. Depth was good, my finds rate went up and I found the extra coverage a great ally. With a little experience I realized this coil was here to stay and the stock 950 quickly got shelved. Now when I’m out hunting I almost exclusively use the Excelerator II 12.5DD, well done Detech!
Update 29/10/2009
This coil is superb; having now had three years experience I can truly say on UK sites it’s awesome. I can find even the smallest objects including cut hammered pennies and tiny celtic silver coins. You will not find a better coil for the MXT than the Excellerator II 12.5DD, period. Anyone who disagrees hasn’t given it the chance it deserves.
 |
 |
 |
 |
 |
 |
 |
||
|
Small celtic and medieval hammered coins found with the Excelerator II 12.5DD. |
||||||||
Update 19/07/2020 WHITE’S ELECTRONICS SHUTS UP SHOP
A few weeks ago I learned the sad news that the home of White’s Electrics USA is to be no more, closing its doors to hobbyist metal detecting in the very near future. The owner states pressure form cheap counterfeit goods and COVID19 had taken its toll, and he is to retire. With still much unknown, I called White’s UK to clarify a few things. I was told the UK branch is to continue servicing and offering spare parts for our much loved detectors, and has no current plans to cease operations. With this in mind, it is still awful news for a manufacture who has delivered so much for well over half a century.
In recent years it has become increasingly difficult to obtain after market coils for my White’s detectors. Only recently I tried to obtain a replacement DETECH 12.5DD for my MXT and was not able to find a single outlet. By chance I stumbled on an eBayer who had two 13” Mars Discovery coils, so I snapped one up before they disappear. Thankfully my MXT should now last another few years. On a personal note, I really do hope a solution can be found which enables White’s Electronics to continue to be at the cutting edge of metal detecting as it has been for many years. To all those staff at White’s Electronics who are affected by this event: Thank you for bringing so much joy to me over the years though the technology which you developed and which I use almost every weekend.
If anyone from Whites wishes to update me further, then please contact me. I will be more than happy to add your comments here.
TO ALL UK SUPPLIERS: PLEASE START SELLING THE 12.5DD EXCELERATOR II FOR WHITES AGAIN!!!
DIGGING TOOLS
The type of digging tool you use will almost certainly be dictated by the soil conditions of the sites you search. The market in metal detecting accessories has grown steadily over the past few years and most spades and shovels can be obtained from local detector dealers. However, if you are like me and don't like what is already available then you can always buy a standard shovel and modify it to suit your needs. Make sure you choose something light, strong and practical because if don't then you will quickly get tired of carrying it around.
I decided to trim down a standard flat bladed shovel in order to create something with a sharp point at the cutting end. This simple modification made an excellent digging tool, great for excavating deep holes and perfect for a whole days detecting.

A good digging tool is essential if you plan to go for long digs.
OTHER DETECTING AIDS
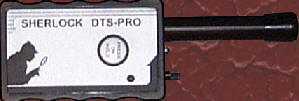 Sherlock DTS Pro detector probe |
Another essential is to obtain a small detector probe. These little probes come in particularly handy when trying to find really small targets that are often difficult to locate. I nearly discarded a hammered coin once because I couldn't find out where it was, only after about five minutes of clearing and scratching at the hay stubble did the coin finally reveal itself. Oh boy that experience taught me a lesson! I finally realized the importance of having a little detector probe. Since then I have always carried one with me to help uncover those smaller more elusive targets. |
|
A good finds pouch is another must! Again remember, like a detector it's a matter of finding the right one for you. I have chosen a pouch which has lots of individual pockets, I have adequate space to separate and store my finds without sacrificing the ability to carry other essentials such as drinks and my mobile phone. One thing I also insure is the presence of at least one zippable pocket so if I find something good I can always store it with extra added safety. When going on a dig it is also a good idea to carry some small plastic self sealable bags with you. If you store finds in these bags this will prevent them from rubbing together with other items in your pouch. Believe me you don’t want to damage things once you’ve found them, you’ll be kicking yourself if you do. |

This finds pouch has plenty of pockets and zipped compartments. Perfect for storing a days clutter! |
GPS Units and Recording Finds
The cutting edge of technology finally reaches detecting. Looking around the web to see what would be best for me I found several devices that particularly took my interest. Ever on the side of caution and with lots of unanswered questions I was unsure which unit would offer the right features. That was until I stumbled across a page from the Portable Antiquities Scheme which described the procedure for recording finds with a handheld GPS from Garmin. The Etrex was a small and compact device with a good sized viewable screen and looked easy to use. Seeing the Garmin in action I quickly became confident it offered what I required. When purchasing I opted for the top of the range Vista C so it was quite expensive, but hey you get what you pay for! I also purchased a car dashboard mounting kit and some additional mapping software. As I am reasonably tech savvy programming the unit with extra cartography was easy and before long I had tailored the unit to the exact specification I wanted. In the field the Garmin proved to be an absolutely essential tool for recording finds and after some weeks I was able locate old finds spots and identify areas accidentally missed. But that’s not all, because I had purchased the car kit I was able to use the GPS navigation functions to direct me to sites I hadn’t been to before. So no more getting lost when it came to new organised club events which is something I am always worried about. The most important point about GPS for us detectorists of course is that archaeologists welcome and recommend the recording of our finds and I think GPS has really helped me to record my local heritage. I was able to give exact details (3m accuracy) of everything they were interested in and that can only be good for the integrity of the hobby.
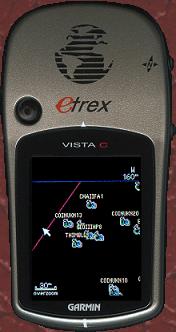
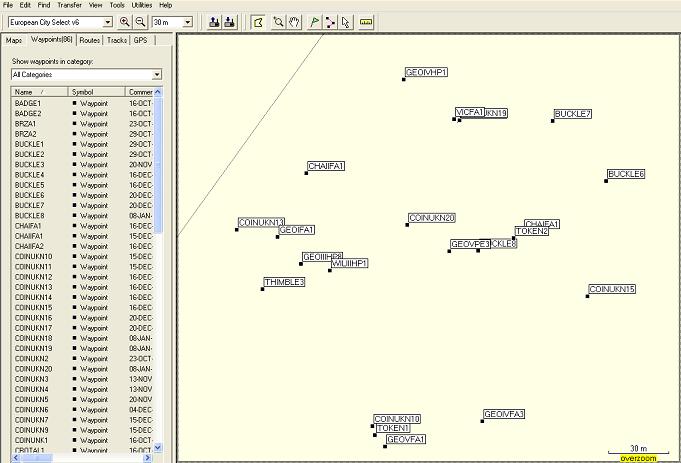
My Garmin GPS Unit. CLICK HERE to see additional mapping software.
SUITABLE CLOTHING
If you live in England like me then you will know it is important to consider the weather. We have quite a varied climate on this little island ranging from warm and scorching summers, to wet, windy and sometimes bitterly cold winters. So use your common sense! Rap up warm in the winter and don't tempt Jack Frost, equally on the other end of the spectrum, make sure you don't get burnt in the summer by the sun. Use sun lotion on exposed areas of skin and wear a hat to shade your head and neck. I almost became ill from sun stroke in August 2003 when I went out on the hottest day of the year. The morning was fine but it got progressively hotter and hotter as the day went on. I had water but even this was not enough as the temperature soared above 30ºC in the early afternoon. I had just returned to the car around 2pm when I started to feel dizzy and sick. Luckily there was some shade nearby for me to lay down and cool off otherwise I would have probably been a gonna!
Aside the weather another thing that you should consider investing in is a good strong pair of shoes or boots. Remember that the soles of your footwear are going to take quite considerable punishment from all your digging and walking, so buy a pair of shoes with good strong soles. Waterproofs are another must especially for your detector if it's not fully waterproof. You can now buy many battery and control box covers from your local detector dealer as aftermarket accessories which are specially designed to protect your detector from the rain. Oh and while on the subject of rain, being in the middle of a wide open field when a thunderstorm strikes is definitely not a good idea! If storms has been forecast for your area you should take this into consideration before planning an outing.
RESEARCH
Sometimes it is good to do a little research of the area you want to hunt and the best way I have found to do this is by asking the landowner if he or she knows the history of the area. In many cases you would be surprised how much people do know about their land and what went on there in the past. Another thing that I have found particularly useful is to obtain an old map of the area. It will show you where all the old footpaths used to be and if your really lucky perhaps where an old building once stood. Arial photos are also helpful and can indicate interesting markings on the ground that could be evidence of human activity sometime in the past. Sometimes a little research at your local reference library can reveal sites where perhaps there used to be an old market, fair or place of public gathering that is no longer used, or well known. Some books could give you information on the history of the village or town near the area you want to search. These clues might help you to determine the sorts of objects you might find and from what period in history they are likely to belong. For example, a village which is known to go back to the early medieval period would most likely reveal good sites for finding medieval artefacts and hammered coins, whereas towns or villages that are younger in date might not be worth searching at all. At the end of the day it is up to you, you could go somewhere do no research and still be surprised at what you find. However a little research will help increase the odds in your favour and will help you find a higher proportion of the older and more desirable finds.
PLACES TO SEARCH
FARMLAND
Detecting on farmland offers much scope and before long you should find all sorts of goodies, that is, if you are hunting in the right areas. I have found that fields near towns and villages with well known Roman and medieval history often turn up Roman, Saxon and hammered coins as well as other important historical artefacts from every day functional items to more desirable finds such as brooches, buckles and jewellery. If you are like me, a coin collector with a passion for medieval history then fields near the village church are often a good bet for turning up hammered coins. You can just picture people in the old days looking for spiritual advice or in attendance of religious mass, just imagine how many of those people may have lost the odd coin as he or she walks a shortcut across the fields on their way to church.
PARKLAND
Depending on where you live you may, or may not have access to public or parkland. If like me, you are from the UK then in most cases parkland will be out of bounds unless you are lucky enough to get permission from the local authorities. I have applied for permission to search council parkland but I have nearly always been refused however, on a few lucky occasions I have been able to go over such sites. Turn up your discrim because there's going to be plenty of trash out there and I don't mean a little, I mean a lot! Usually what I do is to make sure that I don't pick up any iron targets by placing a small rusty nail under the search coil and turning up the discrimination until there is no audible signal. I also like to use my disc edit feature to learn reject small paper foil targets because these can also be a real pain. If you don't have a disc edit or a block edit feature on your detector then I am afraid you are in for a hard time and you will get quite a lot of foil, but it is worth it in the end. Usually public land will yield you plenty of modern coins, buttons and the occasional buckle. However sometimes you might be lucky enough to find the odd gold or silver ring or chain. The best places to look in my experience are around swings, slides, climbing frames and park benches. These are the places where people are mostly likely to go when they are out for a walk. Maybe they go and sit down for a rest on the park bench and something falls out of their pocket. Maybe parents take their children to the swings and they lose some loose change. Either way these lost items will be waiting there for you to find them. All you have to do is go slowly, be patient and be prepared to do a lot of digging before you find something really worth while.
FOOTPATHS
Footpaths can be quite good areas to search especially if they have been is use for many years. Once again coins will be high on the finds list and will range in age from a few years to a few hundred years. I have found that searching the edges of footpaths seems to be the most productive. Why this is I do not fully understand yet but I think it may have something to do with the fact that prolonged rain tends to make footpaths very muddy. For this reason I can imagine people walking along the edges of the path instead of the middle to try and avoid the worst of the mud. Even with mud the ground below it will be very compacted having seen plenty of traffic so you should get a little better depth response than you would on ploughed soil. But be warned, I think a road drill is probably the order of the day! The soil is very hard and it will take a lot of effort to dig even a few inches, so be prepared for lots of exercise when you come to dig a good target. Oh and remember you are on a public footpath make sure you fill your holes in properly. You don't want to end up with anyone tripping over and hurting themselves as a result of your activities.
ORGANISATIONS, CLUBS, RALLIES AND EVENTS
From my own personal experience I would say "definitely join your local metal detecting club or society." You will find lots of other people there who will share your interests not to mention land which you will be able to go on as a result of becoming a member. Most clubs have weekly digs which are well organised and on land which produces many finds. Of course you can still go away with nothing which I have done on several occasions, but it is nice to get out in the country and enjoy the day. You will always be able to pick up good tips and tricks from others and its great for keeping up to date with all the latest news.
Another good tip would be to join a metal detecting regulatory or support organisation who year after year fight for you rights as a detectorist. Here in the UK there a two main organisation you can join, FID, the Federation of Independent Detectorists of whom I am a member, or the National Council for Metal Detecting NCMD. Both are good well established organisations who help the cause and image of metal detecting as a respected and responsible pas' time. By joining these organisations you will be expected to follow the rules of good conduct which help preserve the future of the hobby. You will also receive news letters and regular updates of what is going on in the metal detecting community not to mention news of rallies and other forthcoming events.

CLICK ON THE LINK ABOVE TO FIND OUT MORE ABOUT THE FEDERATION OF INDEPENDENT DETECTORISTS |

CLICK ON THE LINK ABOVE TO GO TO THE WEEKEND WANDERERS DETECTING CLUB |
DETECTOR SETTINGS
Newforce R1
One thing I have not seen on the web as of yet are any useful tips for Newforce R1 owners therefore I have decided to share some of the things I have learned since I got one a few years ago.
The Coin Inland Program is great for most sites however after using it for a few months I thought it could do with little spicing up. To use my custom program choose the Coin Inland program and go into audio tune and increase to 65, also make sure audio discrim is turned off. Next go to disc edit in the discrimination menu and reduce the discrimination from 3 to 2. This will allow Iron to give a spit signal so even though it is heard you can still distinguish the difference from low conductive non-ferrous which won't give the same signal. Now go to the Pinpoint Sensitivity and reduce it to 9, this will help you to pinpoint more accurately. Whilst you are in this menu just check that the Motion Sensitivity is set to 14. That's it, less discrimination and increased background threshold tone will increase your machines sensitivity and depth and should increase your finds rate of the deeper older finds.
White's MXT (Updated 29/10/2009)
The MXT is a very simple but at the same time powerful detector which is often overlooked. The machine has three basic modes:
Coin and jewellery
Relic
Prospecting (for gold)
Coin and jewellery mode is a good starting point for learning the MXT and can be used on most sites. In this mode iron targets are nulled (no sound) while good non-ferrous metals give a nice clean signal. To set up the detector in coin and jewellery mode I would recommend setting your ground toggle to In Land, discrimination to about 2½ on the dial , then power on the machine and set the gain/sensitivity level to 3. With the detector now switched on adjust the threshold until you can just about hear it running in the background. Increase the gain/sensitivity to the manuals recommended setting of 9/10 and pump the coil up and down to ground balance. Once the coil stops responding to ground you are ready to detect. Remember to check your ground toggle is set to In Land for normal conditions and not to Lock which is for iron contaminated sites. If you're a beach hunter then you are probably better off with a PI detector however if you use the MXT then set it to Salt.
If you want to fine tune the gain and increase depth beyond the recommended settings!
Repeat the above procedure but this time keep increasing the gain/sensitivity until your detector becomes unstable. Now back off the gain until the detector becomes stable again. Ground balance by re-pump the coil and when it stops responding you are ready to detect. With this technique I have successfully searched in coin and jewellery mode with the gain/sensitivity as high as 2½ or even 2¾ on some rare occasions.
Relic mode is by far the best on the MXT and I recommend anyone who uses the detector on UK sites to learn it. For some reason Whites adjusted the SAT (Self Adjusting Threshold) in Relic mode to give better stability and thus to our advantage we can push the detector to the limit and fully appreciate its potential. Relic is a mixed all metal and audio discrimination mode meaning it detects all metals but discriminates them according to audio. In this mode you will be confronted with a deep grunt for ferrous and a high pitched tone for non-ferrous. Before you get started insure the MXT is toggled for Relic mode and ground set to In Land for normal searching, if you are on the beach set it to Salt. Next turn the gain/sensitivity dial to 3 thus switching on the detector and adjust the threshold so you can just about hear it running in the background. Now set the discrimination level to 2 and readjust the gain/sensitivity to maximum. Pump the coil up and down to balance and when it stops responding to ground you are ready to detect.
Note: Following this method you are now using the MXT to its full capabilities. If you want to increase detection depth even further then you need a specialist coil such as the range supplied by Detech. Personally I would recommend the 12.5Inch DD Excelerator II.
The last mode available to MXT users is the Prospecting mode. In this mode the detector operates with VCO (Voltage Control Oscillation) for audio discrimination and will detect all metals. Prospecting is a bit like a pot of paint, it does exactly what it says on the tin! The idea is the detector tells you the percentage iron content of the intended target and you make a judgement whether to dig it. This turns the MXT into an ideal nugget hunter making it perfect for hunting in countries like Australia or the Untied States. Personally I have never used Prospecting Mode and I would doubt you would ever need it. Here in the UK we are not graced with rich precious metal deposits, except for maybe Wales, so Prospecting Mode is largely irrelevant. Therefore time and effort learning the MXT should spent on the other detection modes.
GOOD BOOKS
Here is a list of books which might be of interest to you, I have certainly found them most helpful when studying finds I am not so sure about.
TITLE |
ISBN |
COMMENTS |
Coincraft's Standard Catalogue of English and UK Coins (1066 to Date) |
0-95262-288-2 |
An excellent book for identifying hammered coins. It has all the mint marks and locations. Good illustrations. |
SPINK Standard Catalogue of British Coins "COINS OF ENGLAND" and the United Kingdom |
1-902040-56-2 |
A bit difficult to navigate through but this book contains information on almost all British coins right from Celtic gold staters to ultra modern milled coins. |
Buttons of the Regular Army 1855-2000 An Illustrated Reference Guide for Collectors |
0-9524461-1-1 |
A Book you are going to need if you want to identify British army buttons that you might find. |
British Buttons Civilian Uniform Buttons 19th-20th Century |
1 897788 04 8 |
This is a good one for all those buttons which come form every day civilian uniforms. |
Buckles 1250-1800 |
1 897738 17 X |
This book has more examples of Buckles than I have seen in any other. |
Modern Metal Detectors |
0-915920-75-1 |
A good book by Charles Garrett which has lots of useful tips and tricks. |
Celtic & Roman Artefacts |
1 897738 37 4 |
Definitely check this one out it has lots of good pictures. Perfect for identifying Roman and Celtic finds. |
Saxon & Viking Artefacts |
1 897738 05 6 |
Another in the Artefacts series by Nigel Mills. |
Medieval Artefacts |
1 897738 27 7 |
The last of the series on artefacts. All three books are a must! |
Standard Catalogue of World Coins 2006 |
0-87349-987-5 |
The big one! Nearly 2500 pages of coins from all over the world dating from 1901 to present day. |
Roman Silver Coins a Price Guide |
0948964-55-3 |
This one concentrates on silver coinage throughout the Roman period and has some good illustrations. Useful for coins identification purposes. |
Bill Wyman’s Treasure Islands (Britain’s History Uncovered) |
0-7509-3967-2 |
A fantastic insight into the treasure finds made over the last few years in Great Britain. I can definitely recommend this one. |
English Hammered Coinage Vol 1 (Early Anglo-Saxon to Henry 111 c. A.D. 600-1272) |
0907605451 |
A good reference for Saxon coinage, goes into a lot of detail. Now out of print! (Search Ebay, Fullerton’s) |
English Hammered Coinage Vol 2 (Edward 1 to Charles 11 1272-1662) |
0907605346 |
An excellent book for identifying medieval coins and the second in the series by J. J. North. Now out of print! (Search Ebay, Fullerton’s) |
Sterling Imitations of Edwardian Type (N.J. Mayhew) |
0901405205 |
A good book if you happen to come across a continental hammered Sterling like I did. It details the various types of continental coins to have copied the English Penny from the reign of Edward I. Now out of print! (Search Ebay, Fullerton’s) |
I will post another book here when I get one I think is useful. |
